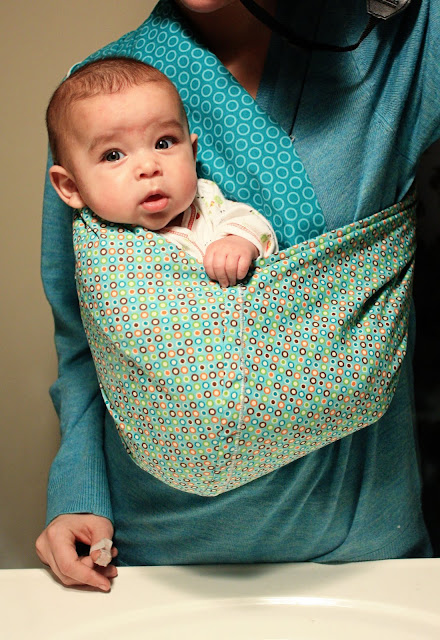
Good thing he loves it too.
I make my own slings. (You know those things run upward of $80!?!?!?! Umm...no thanks.) They are just a piece of fabric sewn together at a curve. No offense to people who pay that kind of $$ for them, I'd just rather find a way to do it myself. :-)
So here is a little tutorial on how to make your own.
First, hire a cute little 2 year old to be your assistant. She's pretending to take pictures using my camera lens cap. Oh, and she verbally requests 2 rubber bands and insists on bows in them by 7:30 every morning. What can I say...she knows what she wants! I like decisiveness!

Ok, seriously, start with 2 pieces of fabric. I used good quality 100% cotton "designer" prints from a boutique down the street. I bought 2 pieces 1 and 5/8 yards of each.
PRE WASH!
Put right sides together and lay it all flat.

Measure the width to be about 24". I like my pouch a wee bit deeper. Most slings are around 22". So somewhere between there is good. My theory is, it can always be taken in, but not let out!

Cut it so you have a piece of fabric (well, 2...right sides together) that is 24" wide by 1 and 5/8 yards long. And cut the excess off. From this you can make some kids slings...or throw it away. Totally up to you!

Then fold it in half width wise, and then fold it in have length wise. So you have a rectangle.
Now you will measure yourself to get the next measurements. I loosely measured from my shoulder to my hip. I added 4 inches for baby and seam allowances.

So my longest measurement was 28" on the fold of the fabric.

Then for the selvages side (edges) Subtract 3-4". I subtracted 4" - and I would say for most, it should be more like 3". I marked it at 24" on the other side.

Then you just cut a curve from one mark to the other. So that when you open it up, you have a smile! ;-)

Next you will unfold the fabrics keeping the right sides together and hem the sides all the way down. Not the curved side...leave that open. Be sure to check your machine and make sure your bobbin is full.... :-)
You will have what looks like an long oval.

Then you will flip the right sides out. And fold in half, matching up the curved edges again.

I press them to have nice, crisp seams.

Now for that curve. Well, remember the French Seam Tutorial I did last summer? Well, you will be making a French Seam along this curve.
Sew through all four layers of fabric exposing the raw edges.

Then flip it on the other side (again I press here to make it easier), to enclose the first hem you just made. You should have no raw edges anymore!

Then you want to pin that flap down with a zig zag stitch to really reinforce the seam.
You ARE carrying precious cargo that you DON'T want falling out.

You gotta put a little elbow grease into this part, because you're fighting the curve while sewing. Just keep pressing the seam down as flat as you can while helping the machine through all these layers by pulling it through a little.

And voila! Fold the sling in half (into itself) and you now have a strong, cute, reversible baby sling!


Then you scoop up your sweet little munchkin and lovingly squish him down in it!
And, oh boy, will he love it!!!
This project should take under an hour (even if it's your first time) once you're fabrics are washed! It is SO easy!

Doesn't he look cute...and sweet...and edible....and squishy....and kissy....and lovey....and snug....yes....
He's as snug as a bug!! And lovin' it!!
I'm hoping to make one for a friend who is expecting a new baby boy and a kids sling for her 2 sweet girls but we keep playin' telephone tag! So, girl...you know who you are! :-) CALL ME!! And we can talk fabrics! :-) I have learned a lot about fabric lately and if you are willing to trust me, I'd love to do it all myself!!! :-) But I know we'll connect soon....I haven't given up yet!!! :-)

No comments:
Post a Comment
If you don't have anything nice to say, then, please don't say anything at all! THANKS!