Showing posts with label sewing. Show all posts

Thursday, May 6, 2010

Flip Flop Fun

This is such an easy way to spruce up kids $2.50 flip flops from Walmart.  Which, by the way (and on a completely different note), couponing has kept me out of Walmart for a while now.  Which is one huge incentive for me to keep up with my coupons!  You get used to wonderful customer service, friendly employees, and a clean store like Publix, that going back to Walmart was like culture shock for me!  Hope it's a while before I go back there again - I think I'll clip some more coupons this morning! ;-)


Back to the flops - the ribbon was $1.97 and I have some left over.  Maybe for a hair bow?


I first made the two bows the way I talked about HERE.  Then I took some wire and secured the bow to the flip flop.


Voila!


Then I took some pink scrap ribbon and covered the wire using a hot glue gun!  Love my mini hot glue gun - I got it for like 4 bucks a couple of years ago!


And there ya go!  Cute flip flops for under $4!


And now I'll show you just how dirty my floors apparently are.  ;-)


Then I decided to get all crazy and make Lillian a pair!!  She LOVES them.  These flip flops were from Target!  It was a little more difficult to get these bows on.  I had to actually sew them to the top.  But I think they turned out so cute! 


So go get crafty!  (And you really don't even have to be that crafty to do this super easy and cute tweak!)

Thursday, April 15, 2010

Sewing Tip: DeMonogramming

Pretty sure I just made that word up.  Demonogram.  Maybe unmonogram?  Nope.  Didn't get past spell check.

Anywho....it sums up what I've been doing a lot of lately.  I have lots and lots of beautiful outfits that I hate see going to waste.  I've pulled out all of the spring clothes for Lillian (and Rhodes) that are hand me downs and most of them have Olivia's (or Landon's) monogram on it!

So in order to get the most out of them, I've decided to take out the monogram and get it remonogrammed with their name/initials.

(Yes, I know you can applique over it or put a patch over it - I've already done that to one outfit and don't want to do it to others)

So, yeah, those monograms are TIGHT!  And it was one of the most tedious things I've ever done.

BUT, after hours and hours of picking out one monogram, I found that there was a much better and FASTER way of get it out!  I wanted to share, because it made things so much easier for me.


I razored them out!  I pretty much shaved off the back and then picked the rest off with a seam ripper.  I think it took 45 minutes for me to get one whole monogram out the last time.  Which is SUPER fast!


Anyways, I hope this helps somebody out!  I can't wait to refill these with the appropriate initials!  :-)

Monday, April 12, 2010

Dirt and Bows

I think everyone in our neighborhood was out doing yard work this weekend.  We joined in by planting our little garden - oregano, thyme, tomatoes, bell peppers, spinach, and jalapenos.  Let's hope my black thumb turns green this year!!  Here's to not killing any plants!!! :-)


I also fell for this contraption.  The Topsy Turvey.  This is the strawberry one.  But we also put tomatoes in the bag too.  I don't know if that's "horticulturally acceptable" (to put two plants together) but whatever.   We plan on adding some more to it once the seeds sprout.


We also pine-strawed our flower beds!  Which is, by the way, the easiest, cheapest way to make your yard look nicer.


I didn't participate outside quite as much as Robert would have liked.  BUT, I did seed the yard in my tank top, workout shorts, and cowboy boots.  I told him he needed a pic for proof, but he spared me.  And you.  ;-)


I did other work things inside the house.  Like replace sink parts.  That's very handy-woman-like, if I do say so myself.  And I'm proud to say that Robert didn't help one.single.bit.


See, when he got our bargain sink, I was spoiled with this sink soap dispenser.  I wash bottles, sippy cups, etc a million times a day.  And this little contraption was such a handy little pump.  I realized I really valued this appliance of sorts and Robert so graciously bought me a new one when the old one broke.

So in order to prove my handiness-self, I decided to install it all by my little self.  Olivia helped.  It was fun.  And now, I have my convenient soap dispenser back working full time. 


Then I did other mother-like tasks.  Like make more bows.  It's how I mark and find my children.....even in the pool.  And yes, they will be swimming in these soon. 


I'm so glad Olivia still wears bows!  And making some new ones made her want to wear them even more!!!

AND, I finally got some pictures of her!!  YAY!


Love her with long hair! 


And she totally busted after this picture.  I mean, she was okay and everything, but she was trying to smile for the camera in mid air.  Semi succeeded.  Then we both laughed.


HAPPY MONDAY Y'ALL!!!

It's going to be a GREAT week!

Wednesday, February 3, 2010

Babytime Sewing: Pouch Sling

Rhodes practically lives in my sling. It goes everywhere with me. It's a life saver. I'm not quite sure I could accomplish anything outside of the house without it, actually.

Good thing he loves it too.

I make my own slings. (You know those things run upward of $80!?!?!?! Umm...no thanks.) They are just a piece of fabric sewn together at a curve. No offense to people who pay that kind of $$ for them, I'd just rather find a way to do it myself. :-)

So here is a little tutorial on how to make your own.


First, hire a cute little 2 year old to be your assistant. She's pretending to take pictures using my camera lens cap. Oh, and she verbally requests 2 rubber bands and insists on bows in them by 7:30 every morning. What can I say...she knows what she wants! I like decisiveness!


Ok, seriously, start with 2 pieces of fabric. I used good quality 100% cotton "designer" prints from a boutique down the street. I bought 2 pieces 1 and 5/8 yards of each.

PRE WASH!

Put right sides together and lay it all flat.


Measure the width to be about 24". I like my pouch a wee bit deeper. Most slings are around 22". So somewhere between there is good. My theory is, it can always be taken in, but not let out!


Cut it so you have a piece of fabric (well, 2...right sides together) that is 24" wide by 1 and 5/8 yards long. And cut the excess off. From this you can make some kids slings...or throw it away. Totally up to you!


Then fold it in half width wise, and then fold it in have length wise. So you have a rectangle.

Now you will measure yourself to get the next measurements. I loosely measured from my shoulder to my hip. I added 4 inches for baby and seam allowances.


So my longest measurement was 28" on the fold of the fabric.


Then for the selvages side (edges) Subtract 3-4". I subtracted 4" - and I would say for most, it should be more like 3". I marked it at 24" on the other side.


Then you just cut a curve from one mark to the other. So that when you open it up, you have a smile! ;-)


Next you will unfold the fabrics keeping the right sides together and hem the sides all the way down. Not the curved side...leave that open. Be sure to check your machine and make sure your bobbin is full.... :-)

You will have what looks like an long oval.


Then you will flip the right sides out. And fold in half, matching up the curved edges again.


I press them to have nice, crisp seams.


Now for that curve. Well, remember the French Seam Tutorial I did last summer? Well, you will be making a French Seam along this curve.

Sew through all four layers of fabric exposing the raw edges.


Then flip it on the other side (again I press here to make it easier), to enclose the first hem you just made. You should have no raw edges anymore!


Then you want to pin that flap down with a zig zag stitch to really reinforce the seam.

You ARE carrying precious cargo that you DON'T want falling out.


You gotta put a little elbow grease into this part, because you're fighting the curve while sewing. Just keep pressing the seam down as flat as you can while helping the machine through all these layers by pulling it through a little.


And voila! Fold the sling in half (into itself) and you now have a strong, cute, reversible baby sling!


Then you scoop up your sweet little munchkin and lovingly squish him down in it!

And, oh boy, will he love it!!!

This project should take under an hour (even if it's your first time) once you're fabrics are washed! It is SO easy!


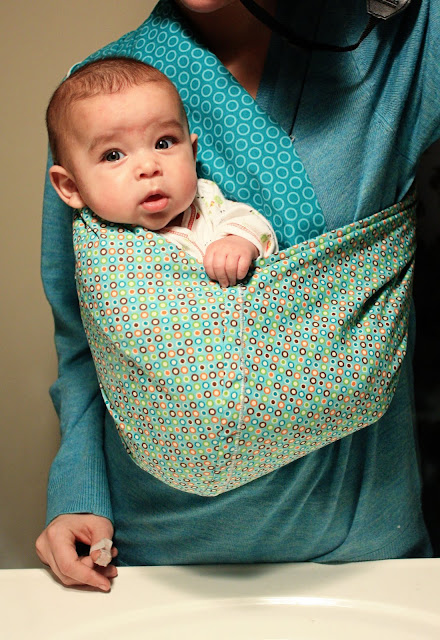
Doesn't he look cute...and sweet...and edible....and squishy....and kissy....and lovey....and snug....yes....

He's as snug as a bug!! And lovin' it!!


I'm hoping to make one for a friend who is expecting a new baby boy and a kids sling for her 2 sweet girls but we keep playin' telephone tag! So, girl...you know who you are! :-) CALL ME!! And we can talk fabrics! :-) I have learned a lot about fabric lately and if you are willing to trust me, I'd love to do it all myself!!! :-) But I know we'll connect soon....I haven't given up yet!!! :-)

Monday, July 20, 2009

Jazz 'Em Up

This sewing spree has gotten me all "crafty". Well, crafty for me - since I do NOT consider myself that crafty. And I pretty much "borrow" other people's ideas....

I saw these CUTE little girls flip flops at a farmer's market here in town and was very tempted to buy some. But I held off and decided to make some for Olivia.

Olivia has these yucky, rubber $2 flip flops that she wears all the time. I would much rather her wear her nice white sandals, but she insists on going for these every day.

So we had to jazz up her plain, rubber flip flops.

I started out just making two bows from this blog post I did HERE. But I stopped after sewing through the middle of the bow. Then I took some craft/bead wire and wrapped it around the bow a couple times first, then pretty much just tied them onto the flip flops the best I could.

To cover the wire, I hot glue gunned a strip of smaller ribbon over the wire. And just wrapped it around under the flip flops. It's not perfect, but it works!! :-)


These are MUCH better now. And within the first hour of her wearing them out, she got a compliment on them!!! Oh yeah!! ;-)

So jazz up your little girls flips flops ladies!! This was a CHEAP shoe too! Probably cost me about $4 or less for the entire project! I wish Lillian's foot was a little bigger...I'd make her some matching ones!!!

Saturday, July 18, 2009

Sewing: French Seam

A French Seam is just a nice neat way to enclose the seams of your projects, especially if you don't have a serger. It's also a really strong seam - I use it for my slings...since they are carrying precious cargo!


Step 1:

Line up seams WRONG SIDES TOGETHER!! Very important and opposite of what you usually do in sewing!


Step 2:

Fold the seam back onto itself with the RIGHT SIDES TOGETHER!!! Which will enclose the raw edges that you just sewed.


Step 4:

Now, at this point, you do not HAVE to do anymore to the seam for the dresses I just made. You have a nice neat seam inside and out. BUT, if you want the little inner piece to lay flat you would open up the seam, press and flatten the inside flap, and zig zag stitch all the way down. This will also result in a zig zag stitch down the outside that is visible. But in this case, I think it adds a nice, unexpected detail to the outside of the dress!

Zig Zagging down the inside flap.


This is the hem and seams of the dress I just made. Nice and neat with a fun zig zag detail.


Hope this helps! If you have any questions, feel free to email me - because I can't reply to comments on my blog very easily.